

TL;DR:
- The kitchen work triangle connects the sink, stove, and refrigerator in a triangle with ideal sides between 4 and 9 feet, creating an efficient cooking zone. Layout shapes, traffic flow, and physical constraints influence proper implementation, often requiring zone planning for larger or open kitchens. Treat the triangle as a flexible guide, layering zones and considering infrastructure to optimize workflow and safety.
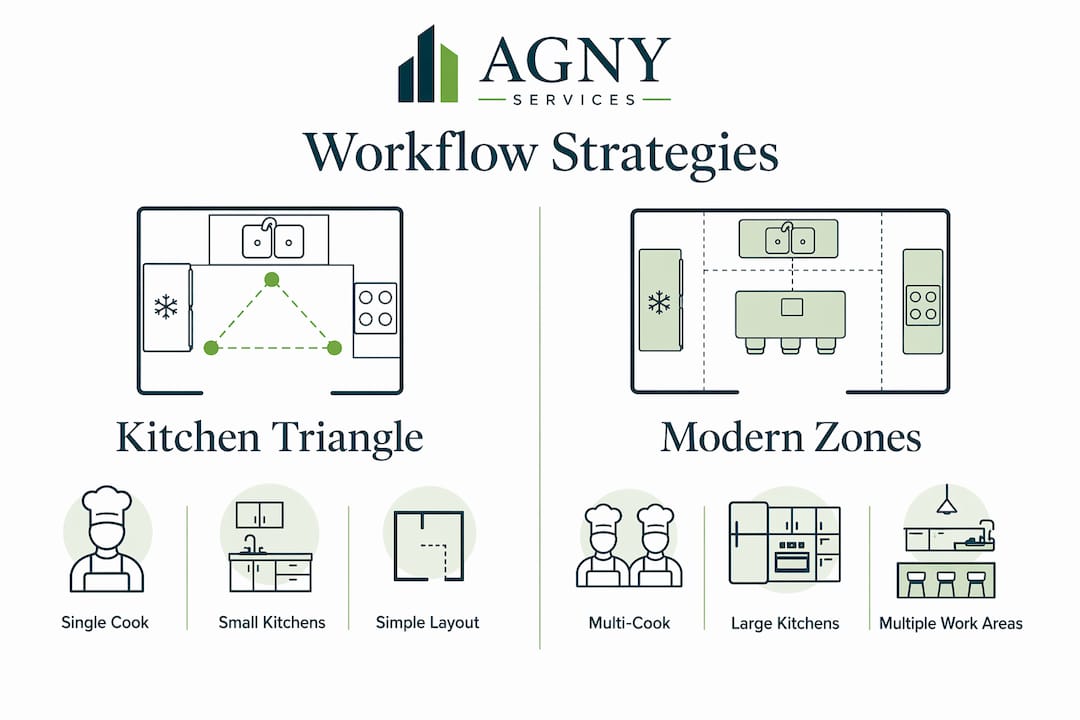
The kitchen triangle concept is a design principle that positions the sink, stove, and refrigerator in a triangular layout to create an efficient, ergonomic workspace that minimizes unnecessary movement during cooking. This foundational idea, formally called the kitchen work triangle, originated from 1940s time-motion studies at the University of Illinois School of Architecture to improve single-cook kitchen efficiency. Understanding it gives you a clear framework for evaluating any kitchen layout, whether you are remodeling an existing space or starting from scratch.
What are the ideal measurements for the kitchen triangle?
The kitchen work triangle connects three fixed points: the sink, the stove or cooktop, and the refrigerator. Each leg measures between 4 and 9 feet, with the total perimeter falling between 13 and 26 feet. That range is not arbitrary. Too small, and cooks collide with cabinets and each other. Too large, and every meal prep session becomes a cardio workout.
These measurements come from decades of ergonomic research and remain the standard in kitchen layout principles today. The National Kitchen and Bath Association (NKBA) still references these guidelines as a baseline for professional kitchen design. Staying within the recommended range reduces fatigue and keeps the cooking process logical and fluid.
Kitchen layouts that support the triangle naturally
Not every kitchen shape accommodates the triangle equally well. Here is how the most common configurations compare:
| Layout | Triangle fit | Notes |
|---|---|---|
| U-shaped | Excellent | Each appliance occupies a separate wall, forming a natural triangle |
| L-shaped | Good | Two points on one wall, third on the adjacent wall |
| Galley | Good | Compact triangle across two parallel walls |
| Island kitchen | Flexible | Island can serve as one triangle vertex |
| Single-wall | Poor | Linear layout prevents a true triangle |
Pro Tip: If your kitchen is single-wall, focus on a linear workflow instead. Place the refrigerator at one end, the sink in the center, and the stove at the other end to mimic the triangle’s logic in a straight line.
The triangle also depends on clear pathways. Pathways narrower than 36 inches that cross the triangle reduce kitchen usability and create bottlenecks. Traffic from other household members walking through the cooking zone is one of the most overlooked sources of kitchen frustration.
How does the kitchen triangle compare to modern zone planning?
The classic triangle was designed for one cook working with three appliances. Modern households rarely fit that model. Open-plan kitchens, multi-cook families, and specialized cooking tasks have pushed designers toward a zone-based approach that the triangle alone cannot address.
Modern kitchen design incorporates work zones covering prep, cooking, washing, storage, and consumption. Each zone groups related tools, appliances, and surfaces together so that multiple people can work simultaneously without crossing paths. A dedicated prep zone with a cutting board, knives, and mixing bowls sits separately from the cooking zone centered on the stove.
Triangle vs. zone planning: when each works best
| Approach | Best for | Limitation |
|---|---|---|
| Kitchen work triangle | Single-cook kitchens under 100 sq ft | Breaks down with multiple cooks or complex tasks |
| Zone-based layout | Open-plan, multi-cook, large kitchens | Requires more planning and square footage |
| Triangle plus zones | Most modern renovations | Needs professional coordination to execute well |
The triangle is ideal for kitchens up to roughly 100 square feet, but larger kitchens benefit from layering zones on top of the triangle framework. Think of the triangle as the skeleton and the zones as the muscle. Neither works as well without the other in a full-scale kitchen renovation.
For multi-cook households, designers plan parallel, non-crossing workflows and multiple work zones to prevent collisions and improve simultaneous kitchen use. A second prep sink on an island, for example, creates a secondary workflow that does not interfere with the primary triangle.
What practical considerations affect triangle implementation?
Knowing the theory is one thing. Applying it during a real remodel involves plumbing, electrical lines, and structural constraints that can shift your entire plan. Here are the key factors to work through before committing to a layout:
Anchor the sink first. The sink is the least flexible appliance due to plumbing and drainage requirements. Moving it means rerouting waste pipes, adjusting vent stacks, and potentially breaking into walls or floors. In most remodels, the sink stays where it is and the rest of the triangle is built around it.
Check gas and electrical lines before moving the stove. Relocating a cooktop or range requires accounting for waste pipe slopes, vent stacks, gas supply, and electrical capacity. Each of these adds cost and complexity. Get a contractor’s assessment before finalizing any layout that moves the cooking appliance.
Keep traffic out of the triangle. Household members walking through the cooking zone during meal prep disrupt workflow and create safety hazards. Position the triangle away from the main path between the kitchen entrance and dining area.
Evaluate islands carefully. Designers advise against adding islands in kitchens narrower than 12 feet. An island that sounds appealing in a showroom can choke your work aisles and turn the triangle into a maze.
Avoid forcing trendy features that break the triangle. A dramatic range hood centered on a feature wall looks great in a magazine but may push your stove to a location that stretches the triangle beyond its effective range.
Pro Tip: Before drawing any layout, measure your existing appliance positions and calculate the current triangle perimeter. If it falls between 13 and 26 feet, you may already have a functional triangle that just needs better organization around it.
For a deeper look at kitchen renovation costs in New York, including what moving plumbing or appliances typically adds to a project budget, Agny has published a detailed breakdown worth reviewing before you commit to a layout change.
How do different kitchen layouts adapt the triangle concept?
Every kitchen shape requires a slightly different interpretation of the triangle work area. Understanding how your specific layout interacts with the triangle saves you from costly redesigns mid-project.
U-shaped kitchens offer the cleanest triangle implementation. The sink, stove, and refrigerator each occupy a separate wall, creating three distinct corners with short, unobstructed legs. This layout keeps the triangle compact and the workflow tight.
L-shaped kitchens place two appliances on one wall and the third on the perpendicular wall. The triangle still works, but one leg tends to run longer. Placing the sink at the corner of the L maximizes the triangle’s efficiency by shortening both adjacent legs.
Galley kitchens fit the triangle across two parallel walls. The layout is compact by nature, which means the triangle perimeter often falls at the lower end of the recommended range. This suits single cooks well but can feel cramped for two people working at the same time.
Single-wall kitchens cannot form a true triangle. The 3×4 kitchen rule suggests having three separate counters about four feet long each to enable efficient workflow in these linear spaces. It is a practical substitute for cooks who want maximum efficiency without the geometry of a true triangle.
Island kitchens offer the most flexibility. Island kitchens often integrate the island as part of the triangle, placing the prep sink or cooktop on the island to create a triangle vertex that floats in the center of the room. This works particularly well in open-plan spaces where the kitchen flows into a living or dining area.
| Layout | Triangle vertex placement | Typical perimeter range |
|---|---|---|
| U-shaped | One appliance per wall | 13 to 20 feet |
| L-shaped | Two on one wall, one on adjacent | 15 to 22 feet |
| Galley | Split across two parallel walls | 13 to 18 feet |
| Island | Island as one vertex | 16 to 26 feet |
| Single-wall | No true triangle possible | N/A |
Understanding kitchen layout principles at this level of detail helps you ask better questions when working with a designer or contractor. The layout you choose now will shape how you cook for the next decade.
Key takeaways
The kitchen work triangle remains the most reliable framework for efficient kitchen workflow design, but it works best when combined with zone planning for modern households.
| Point | Details |
|---|---|
| Triangle measurements matter | Each leg should measure 4 to 9 feet, with a total perimeter between 13 and 26 feet. |
| Sink is the anchor | Moving the sink is costly; build your triangle around its existing position whenever possible. |
| Zones extend the triangle | Add prep, cooking, and washing zones to support multi-cook households and open-plan kitchens. |
| Layout shapes the triangle | U-shaped kitchens offer the cleanest fit; single-wall kitchens require a linear workflow substitute. |
| Traffic flow is critical | Keep household pathways outside the triangle to prevent workflow disruptions and safety hazards. |
What I have learned from real kitchen remodels
After working on dozens of kitchen renovations with Agny, the single most common mistake I see is homeowners treating the triangle as a rigid rule rather than a flexible guide. They read that each leg should be between 4 and 9 feet, then panic when their existing layout produces a leg that measures 10 feet. In practice, a leg that is slightly outside the textbook range often works fine if the rest of the kitchen is well organized.
The bigger problem I encounter is the opposite: homeowners who ignore the triangle entirely in favor of a layout that looks stunning in a rendering but fails the moment someone tries to cook a real meal. A beautiful waterfall island that sits directly in the path between the stove and the sink is a daily frustration dressed up as a design feature.
What actually works is treating the triangle as a starting point and then layering zones on top of it. In a recent project, we kept the sink in its original position, shifted the refrigerator two feet to the left, and added a prep zone adjacent to the stove. The triangle perimeter came in at 19 feet, well within range, and the homeowner gained a dedicated prep surface that made the kitchen genuinely easier to use.
My honest advice: prioritize workflow over aesthetics when the two conflict. You can always add beautiful finishes, but you cannot easily undo a layout that forces you to walk across the kitchen every time you move from the stove to the sink. And if your remodel involves moving plumbing or gas lines, bring in a professional before you finalize anything. The cost of a layout consultation is a fraction of the cost of redoing work that did not account for existing infrastructure.
— Grzegorz
Ready to optimize your kitchen layout?
Applying the kitchen triangle concept correctly requires more than measuring distances on a floor plan. It means accounting for plumbing constraints, traffic flow, appliance placement, and how your household actually cooks. Agny’s kitchen renovation team in New York brings all of that together in one place.

From layout planning and millwork to full kitchen remodels, Agny handles every stage of the process with the kind of precision that prevents costly mistakes. If you are planning a renovation and want a layout that works as well as it looks, explore Agny’s New York kitchen renovation services and see how professional design and construction expertise translates into a kitchen you will actually enjoy using every day.
FAQ
What is the kitchen work triangle?
The kitchen work triangle is a layout principle that connects the sink, stove, and refrigerator in a triangular arrangement to minimize movement and improve cooking efficiency. Each leg of the triangle should measure between 4 and 9 feet, with a total perimeter between 13 and 26 feet.
Does the kitchen triangle still apply in modern kitchens?
The triangle remains relevant, especially for kitchens under 100 square feet and single-cook households. Larger or open-plan kitchens typically combine the triangle with zone-based planning to accommodate multiple cooks and specialized tasks.
What happens if my kitchen triangle is too large?
A triangle perimeter over 26 feet means too much walking between the three main work points, which increases fatigue and slows down meal prep. Repositioning one appliance or adding a secondary work surface closer to the cooking zone can reduce the effective distance.
Can an island be part of the kitchen triangle?
Yes. Island kitchens often place the cooktop or prep sink on the island, making it one vertex of the triangle. This works well in open-plan spaces but requires the island to be positioned carefully so it does not block traffic flow through the kitchen.
How much does it cost to redesign a kitchen around the triangle?
Cost depends heavily on whether plumbing or gas lines need to move. Keeping the sink in its current location and adjusting the refrigerator and stove positions is the most budget-friendly approach. Moving the sink or cooktop adds significant cost due to plumbing, venting, and electrical work.


