

TL;DR:
- Effective bathroom accessibility begins with structural prep, ADA-compliant dimensions, and low-cost safety features like grab bars and non-slip mats. Choosing the right shower design and installing proper anchoring in walls are crucial for safety and long-term usability. Routine maintenance and thoughtful fixture placement ensure ongoing safety, comfort, and independence for users with mobility challenges.
Bathroom accessibility tips are actionable modifications that make bathrooms safer and easier to use for people with disabilities or mobility challenges. The bathroom is the most dangerous room in any home, and the right changes, from grab bars to curbless showers, can prevent falls, support independence, and bring a space into line with ADA (Americans with Disabilities Act) standards. Universal design, the practice of building spaces that work for all ages and abilities, has moved these features from medical necessity to mainstream renovation priority. This guide covers the most effective modifications, organized by cost, complexity, and impact.
1. Essential bathroom accessibility tips to start with
The highest-impact, lowest-cost changes you can make involve three products: grab bars, non-slip mats, and a handheld showerhead. Grab bars, non-slip mats, and handheld showerheads together cost under $200 and prevent the majority of falls among people with mobility challenges. That number matters because most homeowners assume accessibility upgrades require a full remodel.
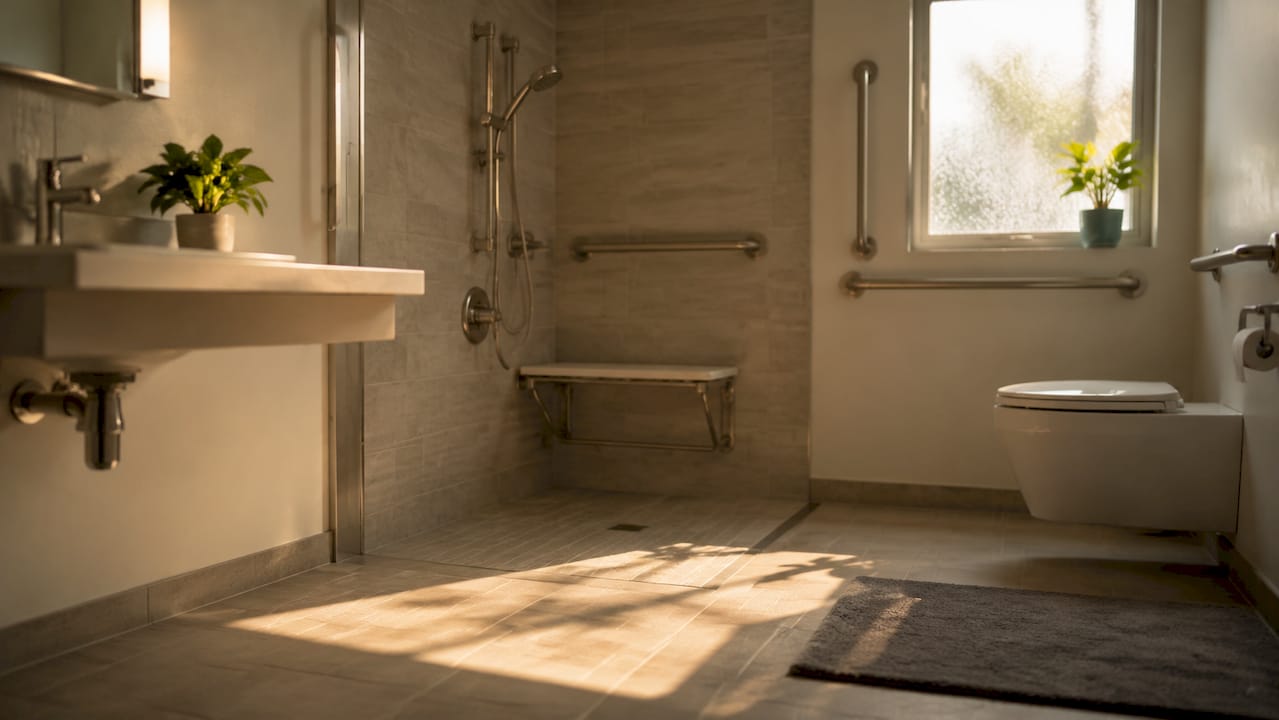
- Grab bars should be mounted 33 to 36 inches above the floor, near the toilet and inside the shower. Grab bars must support at least 110 kg (242 lbs) and have a diameter between 32 mm and 40 mm for a secure grip. Delta commercial-grade bars support up to 500 lbs when anchored into wall blocking.
- Non-slip mats and adhesive strips belong on the shower floor and the bathroom floor outside the tub. Replace them annually since they lose grip over time.
- Handheld showerheads let a seated user control water direction without twisting or reaching. Models with a 60-inch hose and pause button are the most practical.
- Lighting should be bright enough to eliminate shadows near the toilet and shower. Place light switches at 42 to 48 inches from the floor so they are reachable from a seated or standing position.
Pro Tip: Install a night light or motion-activated lighting strip along the baseboard between the bedroom and bathroom. Most nighttime falls happen on that path, not inside the shower.
2. ADA-compliant layout dimensions that actually matter
ADA compliance is not just a legal checkbox for commercial properties. For homeowners, it is the most reliable framework for creating a bathroom that works for wheelchair users, walker users, and anyone with limited mobility. ADA-compliant layouts require a minimum 32-inch clear door opening and a 60-inch diameter turning circle, or an equivalent T-shaped maneuvering space. Without that turning room, a wheelchair user cannot reposition independently.
| Feature | ADA minimum requirement |
|---|---|
| Door clear width | 32 inches (36 inches preferred) |
| Turning circle | 60-inch diameter or T-shaped space |
| Toilet seat height | 17 to 19 inches from floor |
| Grab bar height | 33 to 36 inches above floor |
| Sink knee clearance | 27 inches high, 30 inches wide |
Toilet clearance deserves special attention. You need at least 18 inches of clear space on one side of the toilet for a side transfer, and 60 inches of clear space in front. Raised toilet seats and comfort-height toilets (17 to 19 inches) reduce the effort required to sit and stand, which matters for people with hip or knee conditions.
Door type changes the usable floor area significantly. Pocket doors and barn-style sliding doors eliminate the swing arc of a standard door, reclaiming 6 to 9 square feet of maneuvering space in a small bathroom. Bifold doors are a middle-ground option when a full pocket door installation is not feasible.
Pro Tip: If you are remodeling a bathroom for a specific person, measure their wheelchair or walker before ordering fixtures. Standard ADA dimensions are minimums, not ideals. A wider door or a longer grab bar costs little extra and makes a real difference.
3. Accessible shower options compared
The shower is where most bathroom injuries occur, and the design choice you make here has the largest effect on long-term usability. Three formats dominate accessible bathroom design: curbless showers, roll-in showers, and walk-in showers. Each suits a different level of mobility need.
| Shower type | Best for | Key feature | Trade-off |
|---|---|---|---|
| Curbless | Aging in place, walker users | No threshold, gentle floor slope to drain | Requires waterproofing beyond the shower zone |
| Roll-in | Full wheelchair users | ADA minimum 36 x 36 inches, open entry | Larger footprint needed |
| Walk-in | Moderate mobility challenges | Low threshold (under 2 inches) | Not barrier-free for wheelchair users |
Curbless showers are preferred for aging in place because their barrier-free design allows wheelchair and walker access without any step or threshold. The floor slopes gently toward the drain, and slip-resistant tile keeps the surface safe. This design also photographs well and adds resale value, which is why it has become a standard feature in high-end renovations regardless of accessibility need.
Roll-in showers are the right choice when a wheelchair user needs to roll directly into the shower without transferring to a seat. The ADA requires a minimum 36 x 36-inch floor area, though 60 x 30 inches is more practical for a caregiver-assisted situation. A fold-down teak or plastic shower bench adds flexibility without permanently reducing floor space.
Walk-in showers offer a mid-tier upgrade. The threshold is low enough for most people with limited mobility but not truly barrier-free. Pre-leveled shower systems fit existing plumbing and can be installed in a single day, which makes them a practical option when disruption needs to be minimized.
On flooring, the trade-off between slip resistance and cleanability is real. Highly textured floors offer traction but trap soap and dirt in grout lines, increasing maintenance. Mosaic tile with more grout lines provides better grip than large-format tile. Porcelain with a matte or brushed finish balances both concerns well. You can explore accessible flooring options that prioritize safety without sacrificing cleanability.
4. Structural preparation that most homeowners skip
The single most overlooked step in any accessibility-focused bathroom remodel is installing wood blocking inside the walls before closing them up. Wood blocking inside bathroom walls is the only way to safely anchor grab bars, since drywall alone cannot bear the required load. A grab bar pulled from drywall during a fall causes the exact injury it was meant to prevent.
If you are remodeling now but the primary user does not yet need grab bars, install the blocking anyway. It costs almost nothing during a renovation and makes future grab bar installation a 30-minute job instead of a wall-opening project. Mark the blocking locations on a simple diagram and keep it with your renovation records.
The same logic applies to reinforcing the subfloor around the toilet area if you plan to add a floor-mounted grab bar or a toilet safety frame. A contractor who understands accessible bathroom design will build this preparation into the scope automatically.
5. Fixtures and fittings that improve daily usability
Beyond grab bars and shower design, the individual fixtures in a bathroom determine how much effort every task requires. Lever-handle faucets and anti-scald valves improve usability for people with limited hand strength or dexterity. A lever handle requires a push or pull rather than a grip-and-twist motion, which matters for anyone with arthritis or reduced hand strength.
Anti-scald thermostatic valves limit water temperature at the outlet, protecting users who cannot react quickly to temperature changes. This is a non-negotiable feature for bathrooms used by elderly residents or anyone with reduced sensation in their hands or feet.
Sink height and knee clearance determine whether a wheelchair user can approach the sink directly. A wall-mounted sink at 34 inches with 27 inches of knee clearance underneath allows a wheelchair user to roll forward and use the sink without leaning or reaching. Insulate exposed pipes under the sink to prevent burns on the legs.
Accessibility should be tailored to the specific user’s mobility and strength profile rather than relying solely on standard dimensions. A person with strong upper body strength but limited leg mobility needs different grab bar placement than someone with general weakness. Talk to an occupational therapist before finalizing fixture placement if the primary user has a specific diagnosis.
6. Color contrast, emergency systems, and long-term maintenance
Color contrast is a practical safety tool, not just a design choice. A white grab bar against a white tile wall is nearly invisible to someone with low vision. Choosing grab bars, toilet seats, and light switch plates in a contrasting color to the wall surface makes them immediately identifiable. Dark grab bars on light tile, or light bars on dark tile, both work well.
Emergency call systems belong in any bathroom used by a person who lives alone or has a fall risk. A waterproof pull cord or wireless call button mounted near the toilet and shower floor gives the user a way to summon help without reaching a phone. These systems start at under $50 for a basic model and connect to a caregiver’s phone or a central monitoring service.
“The most dangerous accessibility feature is one that has been neglected. A suction-cup grab bar that has lost its seal, or a non-slip mat that has hardened and curled at the edges, creates a false sense of security that is worse than having no feature at all.”
Non-slip mats and adhesive strips should be replaced annually because they lose effectiveness over time. Suction-cup accessories offer only temporary support and are less safe long-term than permanently mounted hardware. Budget for annual replacement of mats and strips as part of routine home maintenance, the same way you would replace smoke detector batteries.
Key takeaways
Effective bathroom accessibility starts with structural preparation and ADA-compliant dimensions, then builds outward to fixtures, flooring, and maintenance habits.
| Point | Details |
|---|---|
| Start with low-cost basics | Grab bars, non-slip mats, and a handheld showerhead cost under $200 and prevent most falls. |
| Build to ADA dimensions | A 32-inch door opening and 60-inch turning circle are the minimum for wheelchair access. |
| Choose the right shower type | Curbless showers suit aging in place; roll-in showers serve full wheelchair users. |
| Install blocking during renovation | Wood blocking in walls during remodeling makes future grab bar installation safe and simple. |
| Maintain what you install | Replace non-slip mats annually and avoid suction-cup fixtures for any load-bearing purpose. |
What I’ve learned from accessible bathroom remodels
Most homeowners come to an accessibility remodel with a list of products. They want grab bars, a walk-in shower, and a comfort-height toilet. That list is not wrong, but it misses the real question: what does this specific person need to do independently, and what is stopping them right now?
I have seen beautifully specified bathrooms where the grab bar was placed at the right height but on the wrong side of the toilet for the user’s dominant hand. I have seen curbless showers with perfect ADA dimensions where the drain placement created a slope that made the user feel unstable. The standard is a starting point, not a finished answer.
The other thing I push back on is the idea that accessible design has to look clinical. Universal design features like curbless showers and lever-handle faucets are now standard in high-end residential projects because they look good and work well for everyone. A matte black grab bar on white subway tile is not a medical fixture. It is a design choice that also happens to be safe.
The pitfall I see most often in renovation projects is skipping the structural work to save money. Blocking costs almost nothing during a remodel. Retrofitting it after the walls are closed costs significantly more and sometimes means the grab bar never gets installed at all. Do the structural work first. Everything else follows from that.
— Grzegorz
Ready to remodel your bathroom for accessibility?
Agny specializes in bathroom renovations that combine safety, ADA compliance, and design quality. Whether you need a full accessible bathroom remodel or targeted modifications like curbless shower conversion or grab bar blocking, Agny’s team handles the planning, permitting, and construction from start to finish.

Agny works with homeowners and property managers across New York to deliver bathroom renovations that add value while meeting the specific needs of the people using the space. If you are planning a mobility-focused remodel, the right contractor makes the difference between a bathroom that meets code and one that genuinely works. Contact Agny for a consultation and get a project scope built around your specific situation. You can also explore NYC bathroom renovation services to see the full range of what Agny offers.
FAQ
What are the most important bathroom accessibility tips for seniors?
Install grab bars near the toilet and shower, replace the existing shower with a curbless or low-threshold design, and add a comfort-height toilet at 17 to 19 inches. These three changes address the most common fall risks for older adults.
How wide does a bathroom door need to be for wheelchair access?
ADA guidelines require a minimum 32-inch clear opening, with 36 inches preferred for comfortable independent wheelchair use. Pocket or sliding doors are the best option in tight spaces.
What is the difference between a curbless shower and a roll-in shower?
A curbless shower has no threshold and a sloped floor draining to a central point, making it accessible for walkers and most wheelchair users. A roll-in shower is specifically sized and configured for a wheelchair to enter and remain inside during bathing.
Do grab bars need to be installed into studs?
Grab bars must be anchored into wall studs or wood blocking installed specifically for that purpose. Drywall alone cannot support the required load of 242 lbs minimum, and a bar that pulls free during a fall causes serious injury.
How often should non-slip bathroom mats be replaced?
Non-slip mats and adhesive strips should be replaced every year because the grip surface degrades with regular cleaning and use. Suction-cup accessories should not be used as a substitute for permanently mounted safety hardware.


